Why AeroPress?
The AeroPress is a simple yet versatile brewing device. It uses immersion and pressure to extract flavour from your coffee grounds, offering a smooth cup with less bitterness and fewer harsh acids compared with some other methods. It also gives you control over grind size, water temperature, brew time and coffee-to-water ratio—all of which let you match your taste preferences, and this coffee brewing ratios and grind size chart provides a quick reference to balance these variables for better extraction.
What You’ll Need: Tools & Ingredients
- 1. AeroPress coffee maker (chamber + plunger + filter cap)
- 2. Paper filters (or a reusable metal/mesh filter, if you prefer)
- 3. Coffee grinder (preferably a burr grinder for consistency)
- 4. Scale (digital, to weigh coffee and water)
- 5. Timer or stopwatch
- 6. Kettle (gooseneck preferred, for pouring control)
- 7. Mug or cup
- 8. Stir-stick (often included with AeroPress)
- 9. Fresh coffee beans
Ingredients
- 1. Freshly roasted whole-bean coffee
- 2. Hot water (just off the boil or at target temperature)
- 3. Filter(s) for the AeroPress
Key Metrics (for Brewed Within recommended method)
- Coffee dose: 14 g
- Water volume: 200 ml (or grams, since 1ml ≈ 1g for water)
- Water temperature: ~92 °C
- Total brew time: ~1 min 30 sec (~90 sec)
Brewing Step-by-Step (Standard Upright Method)
Here’s how you brew using the AeroPress in the standard upright orientation.
Step 1: Heat the Water
Bring your kettle of water to boil, then let it cool slightly so it reaches approximately 92 °C. If your kettle doesn’t show temperature, let it sit ~30 seconds after boiling for a good approximation.
Step 2: Grind Your Coffee
Weigh out 14 g of coffee beans. Set your grinder to a medium-fine setting (a bit finer than “drip” but coarser than espresso). For example, one guide recommends medium-fine for AeroPress. Grind beans just before brewing for freshness.
Step 3: Prepare the AeroPress
- Insert a paper filter into the filter cap.
- Rinse the filter with hot water (this removes paper taste and warms the device).
- Screw the filter cap onto the chamber.
- Place the AeroPress chamber (with plunger about 1 cm inserted to create seal) on top of your scale and tare to zero.
Step 4: Add Coffee
Pour your 14 g of ground coffee into the AeroPress chamber. Give the chamber a slight shake to level the grounds for even extraction.
Step 5: Start Brewing
Start your timer. Pour hot water (200 ml) into the chamber within about 10 seconds. Wet all the grounds evenly. Use a circular pour or fill to just below the top.
Step 6: Stir and Seal
At ~30 seconds, use the stir-stick to stir the mixture gently for a few seconds, ensuring even saturation. Then at ~1 minute mark insert the filter cap if not already and gently swirl the chamber to mix.
Step 7: Plunge
At ~1 minute 30 seconds, slowly plunge the AeroPress down into the mug. Apply steady pressure until you hear a faint hiss, which signals nearly all liquid has been pushed through the filter. The total brew time is about 1:30.
Step 8: Finalise & Serve
Remove the AeroPress, give your mug a gentle swirl, sniff the aroma, and enjoy your fresh AeroPress coffee from Brewed Within. If your cup is too strong, add a little hot water to taste. If too weak, adjust coffee dose or grind in next brew.
Tips for a Better Cup
Here are some pro tips to refine your brewing and troubleshooting ideas:
- Grind size matters: If the brew is too bitter or hard to plunge, your grind might be too fine. Try a coarser grind next time.
- Water temperature: Cooler water gives smoother taste, too hot may over-extract. Around 90-94 °C is ideal.
- Fresh beans: Use beans roasted within 2–4 weeks. Let them rest ~24 hours after roast before brewing.
- Filter rinse: Always rinse paper filters. A wet filter reduces paper flavour and helps maintain temperature.
- Even pour & stir: Make sure all grounds are wet and stirred so extraction is consistent. If parts of grounds are dry, you’ll get uneven flavour.
- Press pressure: Pressing too fast gives weak brew; too slow may over-extract. Aim for steady 20-30 seconds of pressing after depth is reached.
- Adjust ratio for strength: Want a stronger cup? Increase coffee dose to 16–17 g or reduce water to 180 ml. Want lighter? Go 12 g/200 ml or top up with extra hot water at end.
- Cup size: The 200 ml brew will yield about 150–180 ml of actual coffee (some water remains in grounds/filter). If you want a full 250 ml mug, brew concentrate then add hot water to finish.
Why This Works for Brewed Within
At Brewed Within, we want you to experience the true flavour of our beans—from origin, roast, to cup. This AeroPress method emphasises clarity, balance and flavour purity instead of heavy body or overly strong extraction. The tools, ratios and timings support:
- A clean flavour profile—minimal bitterness or harsh acidity.
- Flexible strength—brew a potent shot or top-up with hot water for a lighter cup.
- Quick brewing—about 2 minutes total from grind to pour.
- Easy clean-up—AeroPress is portable and simple to rinse out after use.
Troubleshooting Quick Guide
Issue | Likely Cause | What to Adjust |
Cup tastes too weak/watery | Not enough coffee or too much water, or grind too coarse | Increase dose to ~16 g, decrease water, or fine the grind one step |
Cup tastes too bitter/over-extracted | Grind too fine, brew time too long, water too hot | Use coarser grind, shorten brew time, reduce water temp |
Pressing is hard or slow | Grind too fine or too much coffee causing tight resistance | Coarsen grind, reduce coffee dose |
Pressing is too easy/fast | Grind too coarse or extraction too quick | Fine grind or increase dose |
Different taste than expected for same beans | Inconsistent dose, water temp, grind or brew time | Use scale & timer, maintain variables constant for repeatability |
Variations You Can Try (After You Master This)
Once you’re comfortable with the base method, you might branch out:
- Inverted method: Start AeroPress upside down, brew, then flip and plunge. This can allow longer immersion and richer body.
- Different ratios: Try 17 g coffee / 220 ml water for a bit more fullness. One guide uses 17 g / 220 ml / 1:15 ratio.
- Metal filter: Use a reusable metal mesh filter instead of paper to allow more oils and body in the cup.
- Cold brew concentrate: Use AeroPress with cool water, longer steep time, then dilute. (Note: not part of standard thermal brew.)
How To Use Your AeroPress
Equipment
- AeroPress coffee maker (chamber + plunger + filter cap)
- Paper filters (or a reusable metal/mesh filter, if you prefer)
- Coffee grinder (preferably a burr grinder for consistency)
- Scale (digital, to weigh coffee and water)
- Timer or stopwatch
- Kettle (gooseneck preferred, for pouring control)
- Mug or cup
- Stir-stick (often included with AeroPress)
- Fresh coffee beans
Ingredients
- Freshly roasted whole-bean coffee
- Hot water (just off the boil or at target temperature)
- Filter(s) for the AeroPress
Instructions
- Heat Water – Boil and cool to about 92 °C
- Grind Coffee – Use 14 g of beans, ground medium-fine.
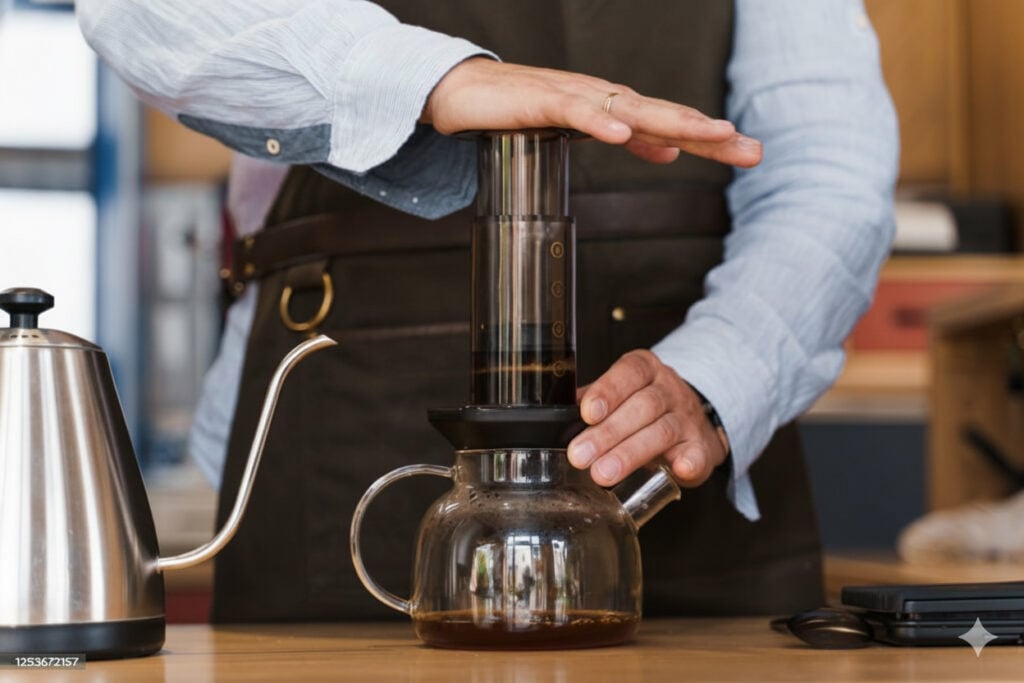
- Prep AeroPress – Insert and rinse filter, screw cap, place on mug and scale.
- Add Coffee – Pour grounds into the chamber and level them.
- Add Water – Start timer, pour 200 ml hot water within 10 seconds to wet all grounds.
- Stir & Seal – Stir gently at 30 sec, attach plunger at 1 min.
- Plunge – At 1:30, press slowly until you hear a hiss.
- Serve – Swirl, taste, and adjust strength with hot water if desired.
Notes
FAQs
What is an AeroPress and why should I use it?
An AeroPress is a portable coffee maker that brews smooth, clean coffee by combining immersion and pressure. It’s easy to use, quick to clean, and makes consistent results every time.
What grind size works best for AeroPress?
Use a medium-fine grind, similar to table salt. Too coarse leads to weak coffee, while too fine makes plunging harder and the flavor bitter.
How much coffee and water should I use?
For one cup, Brewed Within recommends 14 grams of coffee to 200 milliliters of water at about 92 °C. You can adjust the ratio for a stronger or lighter taste.
How long should AeroPress coffee steep?
Let the coffee steep for about one minute, then plunge slowly for 20–30 seconds. The total brew time should be around 1 minute 30 seconds.
Why does my AeroPress coffee taste bitter?
Bitter coffee usually means the grind is too fine or the water is too hot. Try coarsening your grind and keeping water around 90–94 °C.
Can I use the inverted AeroPress method?
Yes! The inverted method lets coffee steep longer before pressing, giving a richer, bolder flavor. Just flip the AeroPress upside down before adding water.
Do I need a special filter for AeroPress?
You can use standard paper filters or metal filters. Paper filters produce a cleaner cup, while metal filters allow more oils for a fuller body.
How do I clean my AeroPress after brewing?
Simply remove the filter cap, push the used coffee puck into the bin, and rinse all parts with warm water. The AeroPress is dishwasher-safe too.
Can I make iced coffee with AeroPress?
Yes! Brew a concentrated shot using less water, then pour it over ice and top with cold water or milk for a refreshing iced coffee.
What makes Brewed Within’s AeroPress method different?
Brewed Within’s guide focuses on balance, clarity, and rich aroma—highlighting the natural sweetness and full flavor of freshly roasted coffee beans.
Final Word
The AeroPress is one of the fastest, most flexible ways to brew a single cup of coffee at home, and with the Brewed Within method above you’ll be set up for a clean, consistent, flavourful result. Focus on fresh beans, proper grind, accurate dose, correct brew time, and the rest follows.
Take your time learning your machine, your beans, and your taste. Once dialled in, you’ll enjoy a great cup of AeroPress brewed coffee any day. Happy brewing! ☕
